This post will explain how to set up multiple monitors with multiple graphic cards on Ubuntu 12.04
글쓴이가 근무하는 사무실에서, 글쓴이가 직접 쓸 워크스테이션이 지게차로 배송이 되어서 왔다 ㅎㅎ.
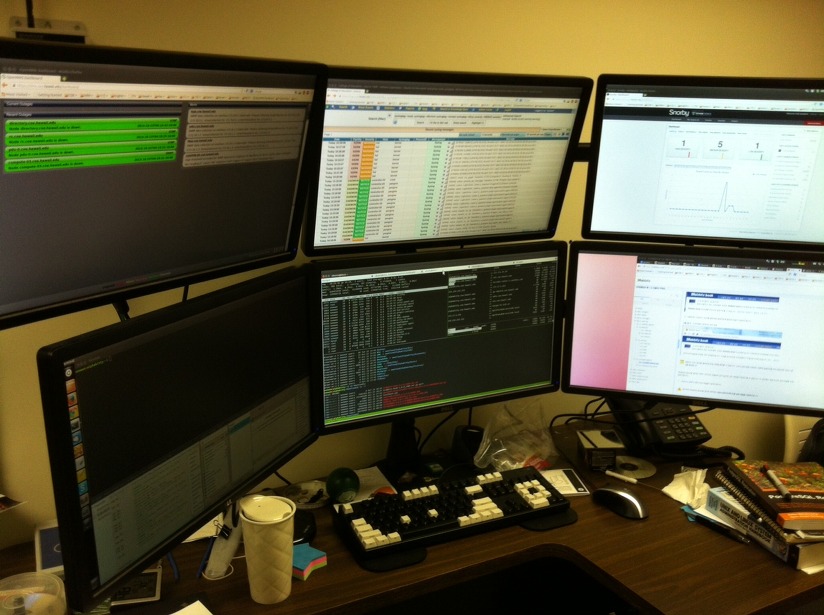
My workstation has two nVidia Quadro K4000 and six monitors. My purpose was, 3 upper monitors(Graphic card #1) would be for monitoring only, and 3 lower monitors(Graphic card #2) would be for my use, such as terminal, web browser, note, and so on. I work at College Of Education, University of Hawaii at Manoa as a Systems Administrator.
본 워크스테이션의 목적은 사실 오픈스택 클라우드의 시뮬레이션을 위해 구입했는데, 사양이 어마어마하게 빵빵하다. 구체적으로 나열하기는, 내것도 아닌데 자랑질하는 거 같아서 생략하고, 한국돈으로 천만원이 넘는다. 뭐 하여간, 모니터 위의 3대는 순전히 인프라 전체의 모니터링만을 하며, 아래 3대는 글쓴이의 작업용이다.
First time, I used Xinerama with nVidia control panel. It worked good, but the only one left-side launcher existed on the left-top monitor, and log-out button existed only right-top monitor. This was not what I wanted. And also, I didn’t want to unintentionally click monitoring windows on the upper monitors. Yes, I wanted to block the mouse pointer moving toward upper monitors. So, I needed two X-Windows managers working simultaneously with only one keyboard and one mouse for only lower monitors. Actually, setting two independant window manager up is easy, but keyboard and mouse inputs work on both lower and upper desktop at the same time.
일단 첫째로 해본건 Xinerama였다. nVidia 콘트롤 패널에서 클릭하면 아주 쉽게 잘되는데, 문제는 우분투 데스크탑의 런치패널이 왼쪽 상단 모니터에만 생기고, 상단 아이콘, 특히 로그아웃 버튼은 오른쪽 상단 모니터에만 생기니까 너무 불편했다. 게다가 중요한 건, 위의 모니터링 시스템들이 전부 웹브라우저이기 때문에, 컴퓨터 쓰다가 잘못해서 상단을 클릭하면 모니터링 페이지가 클릭된 페이지로 넘어가게 되서 이것 역시 불편했다. 무엇보다도 마우스 포인터가 위로 넘어가지 않길 바랬다. 따라서, 글쓴이가 원한건 두개의 독립된 윈도우매니저였으며, 키보드 하나와 마우스 하나로 아래 3대의 모니터만 컨트롤할 수 있어야만 했다. 윈도우 매니저 2개 설정하는 것 자체는 쉽지만, 문제는 두개의 서로다른 윈도우 매니져에서 키보드와 마우스는 같이 움직인다는게 문제였다.
I spent almost two days to figure out how to do this, and actually the configuration is very simple. The configuration files we need are only two, /etc/lightdm/lightdm.conf and /etc/X11/xorg.conf. I read this manual, https://help.ubuntu.com/community/MultiseatX
이것을 알아내기 위해서 대략 2일 정도를 소모했지만, 그에 비해 설정은 매우 간단하다. 여기서 우리가 필요한 파일은 /etc/lightdm/lightdm.conf 파일과 /etc/X11/xorg.conf 이다. 또한, 본 매뉴얼을 작성하기 위해 https://help.ubuntu.com/community/MultiseatX 이 글을 읽어봤었다.
For easy management multiple graphic cards and monitors, I split xorg.conf into two files, xorg_upper.conf and xorg_lower.conf. It doesn’t matter to merge or split it. It’s up to you.
관리의 용이함을 위해, xorg.conf 파일을 둘로 나눴다. 윗모니터용 xorg_upper.conf, 아래 모니터용 xorg_lower.conf. 쪼개든 합치든 상관없다.
Let’s see /etc/lightdm/lightdm.conf file.
[SeatDefaults]
user-session=true
greeter-session=unity-greeter
allow-guest=false
greeter-hide-users=true
greeter-show-manual-login=true

[Seat:0]
xserver-config=/etc/X11/xorg_lower.conf
xserver-command=/usr/bin/X -layout Layout0
user-session=ubuntu

[Seat:1]
xserver-config=/etc/X11/xorg_upper.conf -sharevts -allowMouseOpenFail -pointer Mouse1
xserver-command=/usr/bin/X -layout Layout1
user-session=ubuntu
autologin-user=monitor
autologin-user-timeout=0
Configuration is easy, right? One thing we should know is, I’ll block keyboard and mouse inputs on upper monitors, Seat:1 which means that I won’t have a control. Thus, upper desktop should enable “Auto-Login”. Don’t worry. We can control it through the VNC (Remmina). If you confirm this works, then remove “-sharevts -allowMouseOpenFail -pointer Mouse1” and configure the remote desktop and automatic login on System Setting menu. And then add “-sharevts -allowMouseOpenFail -pointer Mouse1” again. Restart lightdm.
딱 봐도 설정이 어렵지는 않다. 한 가지 우리가 알고있어야할 점은, 윗 모니터들은 키보드와 마우스 입력을 막을 예정이고, 그렇다면 윗 모니터들을 제어할 방법이 없어지게 된다. 따라서, 자동 로그인을 키고 원격 데탑 설정만 해주면 된다. 위의 설정파일을 적용해보고 잘되는게 확인되면 마우스 입력을 막아주는 옵션인 “-sharevts -allowMouseOpenFail -pointer Mouse1” 부분을 잠시 지우고 로그인해서 자동로그인와 원격데탑 설정을 해준뒤 다시 로그아웃해서 옵션을 넣어주고 lightdm을 재시작해주면 된다.
The following is xorg_lower.conf. Nothing different. You can copy xorg.conf and rename it to xorg_lower.conf.
아래는 xorg_lower.conf 파일이다. 설정은 기본 xorg.conf와 다를게 없다. 그걸 그냥 복사해서 이름만 바꿔주면 된다.
Section "ServerLayout"
    Identifier     "Layout0"
    Screen      0  "Screen0" 0 0
    InputDevice    "Keyboard0" "CoreKeyboard"
    InputDevice    "Mouse0" "CorePointer"
    Option         "Xinerama" "0"
EndSection

Section "Files"
EndSection

Section "InputDevice"
    # generated from default
    Identifier     "Mouse0"
    Driver         "mouse"
    Option         "Protocol" "auto"
    Option         "Device" "/dev/psaux"
    Option         "Emulate3Buttons" "no"
    Option         "ZAxisMapping" "4 5"
EndSection

Section "InputDevice"
    # generated from default
    Identifier     "Keyboard0"
    Driver         "kbd"
EndSection

Section "Monitor"
    # HorizSync source: edid, VertRefresh source: edid
    Identifier     "Monitor0"
    VendorName     "Unknown"
    ModelName      "DELL E2313H"
    HorizSync       30.0 - 83.0
    VertRefresh     56.0 - 76.0
    Option         "DPMS"
EndSection

Section "Device"
    Identifier     "Device0"
    Driver         "nvidia"
    VendorName     "NVIDIA Corporation"
    BoardName      "Quadro K4000"
    BusID          "PCI:131:0:0"
EndSection

Section "Screen"
    Identifier     "Screen0"
    Device         "Device0"
    Monitor        "Monitor0"
    DefaultDepth    24
    Option         "Stereo" "0"
    Option         "nvidiaXineramaInfoOrder" "DFP-0"
    Option         "metamodes" "DVI-I-1: nvidia-auto-select +3840+0, DP-2: nvidia-auto-select +1920+0, DP-3: nvidia-auto-select +0+0"
    Option         "SLI" "Off"
    Option         "MultiGPU" "Off"
    Option         "BaseMosaic" "off"
    SubSection     "Display"
        Depth       24
    EndSubSection
EndSection
Now, let’s see the important file, xorg_upper.conf file. It’s almost same. ServerFlags section is added on the top, and mouse#, keyboard# and screen# are not 0.
이제 중요한건, xorg_upper.conf 파일이다. 거의 다 비슷한데 맨 위 ServerFlags가 추가됐고, Mouse 넘버나 키보드 넘버, 스크린 넘버 등이 조금씩 다르다. 위의 파일과 비교해보자.
Section "ServerFlags"
    Option         "DefaultServerLayout" "Layout1"
    Option         "AllowMouseOpenFail" "True"
    Option         "AllowEmptyInput" "True"
    Option         "AutoAddDevices" "False"
    Option         "AutoEnableDevices" "False"
    Option         "DontVTSwitch" "False"
EndSection

Section "ServerLayout"
    Identifier     "Layout1"
    Screen      1  "Screen1" 0 0
    InputDevice    "Keyboard1" "CoreKeyboard"
    InputDevice    "Mouse1" "CorePointer"
    Option         "Xinerama" "0"
EndSection

Section "Files"
EndSection

Section "InputDevice"
    Identifier     "Mouse1"
    Driver         "void"
EndSection

Section "InputDevice"
    Identifier     "Keyboard1"
    Driver         "void"
EndSection

Section "Monitor"
    # HorizSync source: edid, VertRefresh source: edid
    Identifier     "Monitor1"
    VendorName     "Unknown"
    ModelName      "DELL E2313H"
    HorizSync       30.0 - 83.0
    VertRefresh     56.0 - 76.0
    Option         "DPMS"
EndSection

Section "Device"
    Identifier     "Device1"
    Driver         "nvidia"
    VendorName     "NVIDIA Corporation"
    BoardName      "Quadro K4000"
    BusID          "PCI:132:0:0"
EndSection

Section "Screen"
    Identifier     "Screen1"
    Device         "Device1"
    Monitor        "Monitor1"
    DefaultDepth    24
    Option         "Stereo" "0"
    Option         "nvidiaXineramaInfoOrder" "DFP-0"
    Option         "metamodes" "DVI-I-1: nvidia-auto-select +3840+0, DP-0: nvidia-auto-select +1920+0, DP-1: nvidia-auto-select +0+0"
    Option         "SLI" "Off"
    Option         "MultiGPU" "Off"
    Option         "BaseMosaic" "off"
    SubSection     "Display"
        Depth       24
    EndSubSection
EndSection
I hope this helps!
Leave a Reply